Third-party-support
More third-party libs are coming soon.
Comments
WARNING
You can only choose one comments system for your blog or theme-melody will choose one for you if you enable two or more comments systems.
Disqus
Sign up the disqus, setup your own disqus, and enable the disqus in theme-melody
Set the melody.yml
disqus:
  enable: true # or false
  shortname: your disqus short-name
  count: true # or false. It show the comments of your post
Screenshot

Laibili v1.4.0+
Sign up the laibili, setup your own laibili, and enable the laibili in theme-melody
Set the melody.yml
laibili:
  enable: true # or false
  uid: your laibili uid
The laibili uid you can find in here:

Screenshot

Gitment v1.4.0+
Follow the guide of gitment to get your github Oauth app's client id and secret.
And then set the melody.yml:
gitment:
  enable: true # or false
  owner: your github name
  repo: your github repo
  client_id: your client id
  client_secret: your client secret
For example:
gitment:
  enable: true
  owner: Molunerfinn
  repo: Molunerfinn.github.io
  client_id: xxxx
  client_secret: yyyy
Screenshot

Gitalk v1.4.3+
Follow the guide of gitalk to get your github Oauth app's client id and secret.
And then set the melody.yml:
gitalk:
  enable: true
  client_id: your client id
  client_secret: your client secret
  repo: your github repo
  owner: your github name
  admin: Github repo owner and collaborators, only these guys can initialize github issues
Screenshot

Valine v1.4.3+
Follow the guide of Valine to setup your LeanCloud apps.
And then set the melody.yml:
valine:
  enable: false # if you want use valine,please set this value is ture
  appId: # leancloud application app id
  appKey: # leancloud application app key
  notify: false # valine mail notify (true/false) https://github.com/xCss/Valine/wiki
  verify: false # valine verify code (true/false)
  pageSize: 10 # comment list page size
  avatar: mm # gravatar style https://valine.js.org/#/avatar
  lang: zh-cn # i18n: zh-cn/en
  placeholder: Just go go # valine comment input placeholder(like: Please leave your footprints )
  guest_info: nick,mail,link #valine comment header in
Screenshot

Vssue
Follow the Vssue guide to setup vssue
vssue:
  enable: false # Set to true to enable
  platform: github-v4
  owner: # The owner's name of repository to store the issues and comments
  repo: # The name of repository to store the issues and comments.
  clientId:
  clientSecret: # only required for some of the platforms
  autoCreateIssue: false # Auto create issue on platform (github/...)
  baseURL: "" # For self-hosted gitlab/bitbucket only, see here: https://vssue.js.org/options/#baseurl
  perPage: 10 # How much comment/page
  labels: 'Vssue'
Share
WARNING
You can only choose one share system for your blog or theme-melody will choose one for you if you enable two or more share systems.
AddThis
Find your pub-id

Set the melody.yml
addThis:
  enable: true # or false
  pubid: your pub-id
Screenshot

Sharejs
Check the sharejs for more details.
Set the melody.yml
sharejs:
  enable: true
  disabled_sites: the sites you don't want to display
For example:
sharejs:
  enable: true
  disabled_sites: google,facebook
Screenshot

Search
After set the search system, you will have a global search button in the navbar since v1.5.6!

Algolia
You should install hexo-algolia or hexo-algoliasearch. Follow their doc to setup.
Set the
melody.yml
algolia_search:
  enable: true # or false
  hits:
    per_page: 10 # the number of search results per page
  labels:
    input_placeholder: Search for Posts
    hits_empty: "We didn't find any results for the search: ${query}" # if there are no result
    hits_stats: "${hits} results found in ${time} ms"
Screenshots
Click the search icon

Search results

Local search v1.3.0+
You should install hexo-generator-search. Follow its doc to setup. Only supporting the
xmlfile.Set the
melody.yml
local_search:
  enable: true # or false
  labels:
    input_placeholder: Search for Posts
    hits_empty: "We didn't find any results for the search: ${query}" # if there are no result
Screenshots

Analytics
Baidu analytics
Login the baidu tongji web site
Find your baidu tongji code

3. Set the melody.yml
baidu_analytics: your code
Google analytics
Login the google analytics web site
Find your google analytics code

3. Set the melody.yml
google_analytics: your code # usually start with `UA-`
Tencent analytics v1.6.0+
Login the tencent analytics web site
Find your tencent analytics code
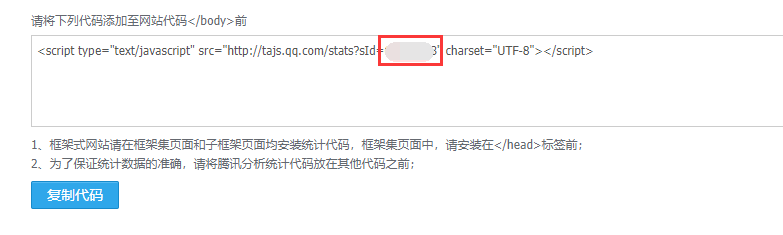
3. Set the melody.yml
tencent_analytics: your code
Adsense
Google adsense v1.6.0+
Login the google adsense web site
Find your google adsense client-id, usually start with
ca-pub-
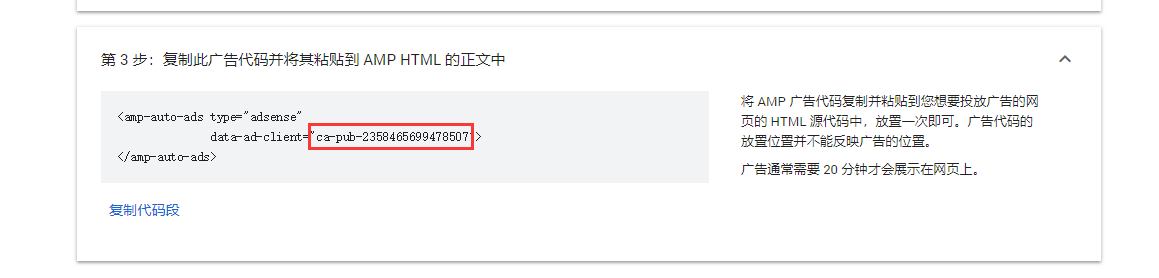
3. Set the melody.yml
google_adsense:
  enable: true
  js: //pagead2.googlesyndication.com/pagead/js/adsbygoogle.js
  client: ca-pub-...........
  enable_page_level_ads: true
Screenshot

Access Logs (UV/PV)
busuanzi
You can visit the busuanzi web site for more details.
Set the melody.yml
# busuanzi count for PV / UV in site
busuanzi:
  # count values only if the other configs are false
  enable: true
  # custom uv span for the whole site
  site_uv: true
  site_uv_header: <i class="fa fa-user"></i>
  site_uv_footer:
  # custom pv span for the whole site
  site_pv: true
  site_pv_header: <i class="fa fa-eye"></i>
  site_pv_footer:
  # custom pv span for one page only
  page_pv: true
  page_pv_header: <i class="fa fa-file-o"></i>
  page_pv_footer:
Screenshot

Mathematical formula
MathJax
TIP
It is recommended to use Katex for better results, as described below!
Set the melody.yml
mathjax:
  enable: true # or false
  cdn: https://cdn.bootcss.com/mathjax/2.7.2/MathJax.js?config=TeX-AMS-MML_HTMLorMML # required
And you need to change the default markdown render engine to fit this.
Check: hexo-renderer-kramed
Get in your hexo site folder and do the following things(Not the theme-melody folder!):

Screenshot

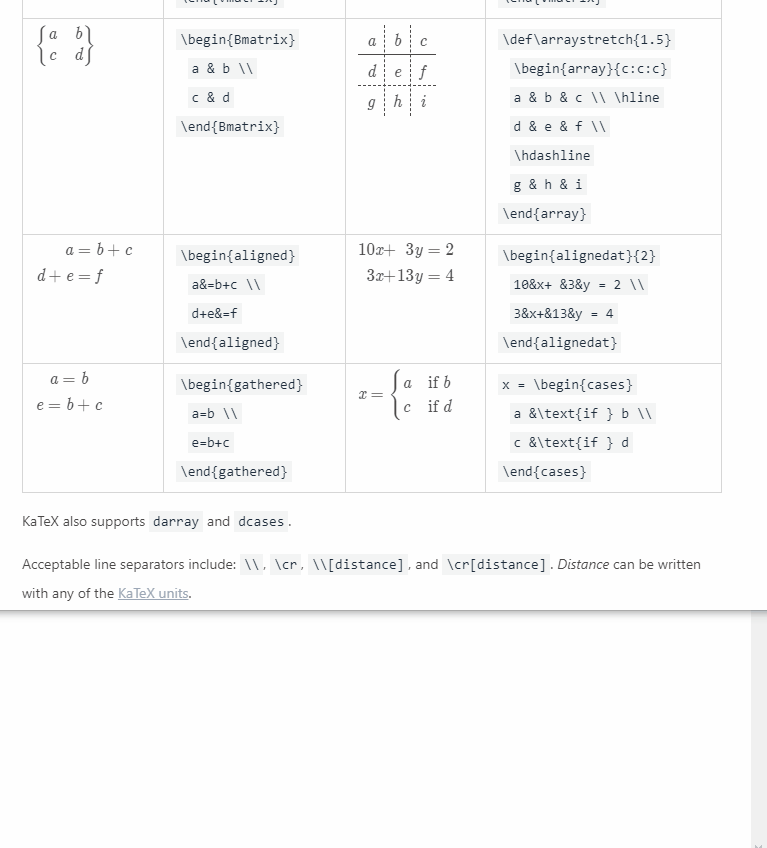
KaTeX v1.6.0+
Disable MathJax, and then modify your melody.yml to load katex.min.css:
katex:
  enable: true
  cdn:
    css: https://cdn.jsdelivr.net/npm/katex@latest/dist/katex.min.css
You don't need katex.min.js to render math equations. Instead, you have to uninstall your old hexo render and hexo-math, and then install hexo-renderer-markdown-it-plus:
# Uninstall `hexo-renderer-kramed` or `hexo-renderer-marked` or whatever your hexo markdown renderer
# You can check your installed renderer in your package.json
npm un hexo-renderer-marked --save

# or

npm un hexo-renderer-kramed --save

# uninstall `hexo-math`
npm un hexo-math --save

# install `hexo-renderer-markdown-it-plus`
npm i @upupming/hexo-renderer-markdown-it-plus --save
Note hexo-renderer-markdown-it-plus is out-of-maintenance, so we use @upupming/hexo-renderer-markdown-it-plus. This fork makes use of @neilsustc/markdown-it-katex which is also used by VS Code plugin Markdown All in One, so we will get latest KaTeX features such as \tag{}.
And you can customize KaTeX as you want through @neilsustc/markdown-it-katex, all the options available is at https://katex.org/docs/options.html. For example, if you want to disable the noisy warning printed by KaTeX in the console, you can set the strict to false by add the following lines in your root _config.yml:
markdown_it_plus:
  plugins:
    - plugin:
      name: "@neilsustc/markdown-it-katex"
      enable: true
      options:
        strict: false
Of course, you can define you own macros using this feature.
Because KaTeX is faster and lightweight, there are fewer features than MathJax (right-click menu). For those are used to MathJax, we also added Copy As TeX Code support for KaTeX, which is enabled by default.
Screenshot
Word counting v1.3.0+
To have the word counting feature for theme-melody, you need to do the following things:
- Go to the hexo site folder
npm install hexo-wordcount --saveoryarn add hexo-wordcount- Set the
melody.yml
wordcount:
  enable: true
Screenshot

Sticky posts v1.6.0+
To have the ability to sticky posts, you need to do the following things:
- Go to the hexo site folder
npm uninstall hexo-generator-index --saveand thennpm install hexo-generator-index-pin-top --save- You can add the
top: Truefield to post's front-matter to pin it. - You can checkout hexo-generator-index-pin-top for more details.
For example:
if one of your post file is like the following:
title: xxxx
tags:
  - xxx
date: 2018-08-08 08:08:08
---
// ....
now add the top: True:
title: xxxx
tags:
  - xxx
date: 2018-08-08 08:08:08
top: True
---
// ....
Screenshot
